All listings added into Paragon must include at least 1 photograph and optionally up to 60 photographs. This page outlines specific details about how to upload photos and best practices, as well as how to upload documents to your listings.
JUMP TO A SECTION:
Photographs Tips & Information
Uploading Photographs
Marking Photo Private
Deleting Photographs
Replacing Photos
Documents
Photographs Tips & Information
All 60 photos can be uploaded at the same time by clicking the "Upload Multiple Photos" button.
All listings, including Closed listings, must have at least 1 photograph. Listings can have up to 60 photographs.
Photos must be at least 640 pixels wide by 480 pixels high or Paragon will block the upload of the image for being too small. To ensure a portrait (vertical) oriented image will be uploaded, we recommend that you configure your camera for minimum resolution of 1280 x 960 (or 2048 x 1563, if possible). This will provide you with some freedom to slightly crop your photos and still meet the 640 pixel minimum requirement for vertically oriented images.
The following are specific to Paragon:
For the best system performance, photos should not exceed 15 MB in size.
All photos above 800K in file size are compressed to approximately 800K in Paragon. This could result in a reduction in quality. For instances where photos are larger than the 800K limit, it is recommended that the images not exceed 15MB in file size.
3072 x 2304 pixels (1.33) is the optimal aspect ratio for photos in Paragon.
Recommended formats are .jpeg, .gif and .png files
Special characters, such as V: * ? < > | & @ # $ ^ ~ ; % = ! { } etc., cannot be used in the photo file name.
The key to eliminating the borders around pictures in the MLS is the "aspect ratio" of images you upload. Aspect ratio is defined as the width of an image in pixels divided by its height in pixels.
The only photograph aspect ratio that you can upload into the MLS database without "scaling" that will eliminate borders or blank spaces is 1.33, or 3072 x 2304 pixels. You can upload images larger than this, but you must maintain the 1.33 aspect ratio.
To eliminate the borders/blank spaces around photos in the MLS, your options are:
Check your camera settings to see if you can shoot images natively in the 1.33 aspect ratio.
Re-size (scale) the images from your current camera to a 1.33 aspect ratio. The risk here is image distortion.
Crop the images from your current camera to a 1.33 aspect ratio.
Use a camera that has a 1.33 aspect ratio sensor.
Uploading Photographs
Step 1: Upload Photos
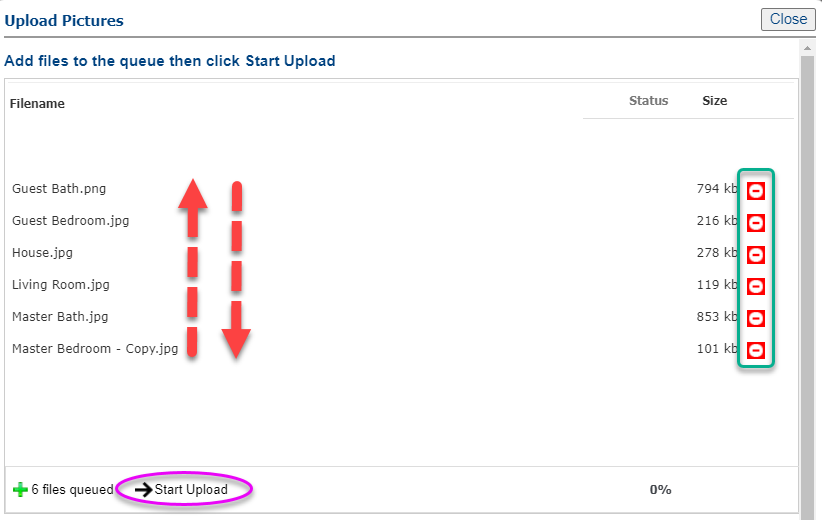
- From listing maintenance, click "Add/Edit Pictures" from the panel on the left.
- Click "Upload Multiple Photos."
- Click "Add Files," which will open up your computer file browser for you to find where the photos are stored.
- Select the photos.
- Once photos are in the upload box, you can drag and drop each file to arrange it in a particular order.
- Note the red minus icon on the far right allowing you to remove a photo if you don't need to upload it.
- Click "Start upload."
Step 2: Arrange Photos
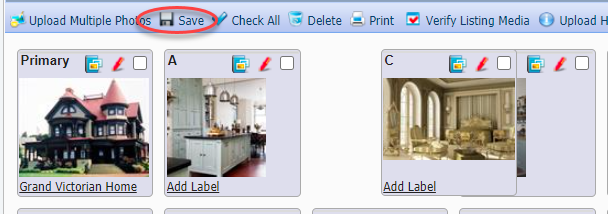
- Once photos are uploaded, drag and drop each box to set your preferred order.
- The first photo will be the primary.
- Click "Save."
Step 3: Rotate/Crop Photos
- If you need to crop or rotate a photo, click the red pencil icon.
- To rotate, use the arrow icons.
- To crop, select the area you want to keep, then click the crop icon.
- Click "Save."
Step 4: Add Custom Labels
- Click "Add Label."
- Add a label, which will display on your listing in Paragon and is included in the data feed to PrimeMLS Public Websites and third party sites to which you elected to send your listings.
- You may also add a longer description (up to 255 characters). The description is only displayed within Paragon.
- Click "Save."
Marking Photo Private
Step 1: Find the listing
Go to the "Listings" menu and select "Listings".
Find the listing you wish to edit in your inventory.
On the spreadsheet, click the number of photos from the "Picture Count" column.
Step 2: Mark the Photo Private
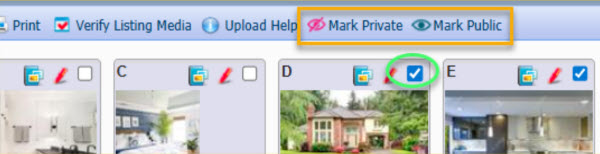
Check the photos that should be private>
Select "Mark Private".
Save your changes.
Deleting Photographs
Step 1: Find the listing
- Go to the "Listings" menu and select "Listings."
- Find the listing that you wish to edit in your inventory.
- On the spreadsheet, click the number of photos from the "Picture Count" column.
Step 2: Delete the Photo
- Delete photos by checking each and clicking "Delete."
- If you delete a photo, make sure to drag the empty box to the end, otherwise there will be a empty photo slot when agents view your listings.
Replacing Photos
Step 1: Find the Photo
- Instead of deleting, you can replace an image with a new one.
- Go to the "Listings" menu and select "Listings."
- Find the listing that you wish to edit in your inventory.
- On the spreadsheet, click the number of photos from the "Picture Count" column.
Step 2: Upload the New Photo
- Click the blue icon on the photo.
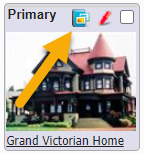
- In the photo upload screen, click "Add Files," which will open up your computer file browser for you to find where the photos are stored.
- Select the new photo.
- Once photos are in the upload box, click "Start upload."
- The original photo will be deleted and replaced with the new photo.
- If there was a label and/or description on the original photo, that remains, so be sure to update accordingly.