
The spreadsheets are a great way to review several listings easily in an Excel-like view with many customization opportunities! Watch the video to learn more or follow the guided instructions below.
WAYS TO CUSTOMIZE THE SPREADSHEET
Re-Size Columns
Step 1: Choose the Column to Resize
Choose the spreadsheet you wish to edit by opening the green "Reports" button from results and open the "Spreadsheets" section. Each spreadsheet report looks the same until you customize. Spreadsheets are customized per class. For example, if you are viewing Residential results, the changes made to this spreadsheet will only be reflected on Residential results.
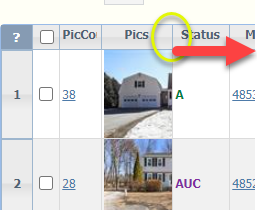
Columns can be made smaller or bigger by dragging the column out or in. For the column you want to resize, click on the line between that column and the next column in the header.
Step 2: Resize the Column
Drag in to minimize the column.
Drag out to enlarge the column.
When you finish resizing the column, notice the green pop-up in the top, right corner confirming your changes have been saved.
TIP: Widen the picture column so you are able to see the full photo!
Step 3: Change Header Labels
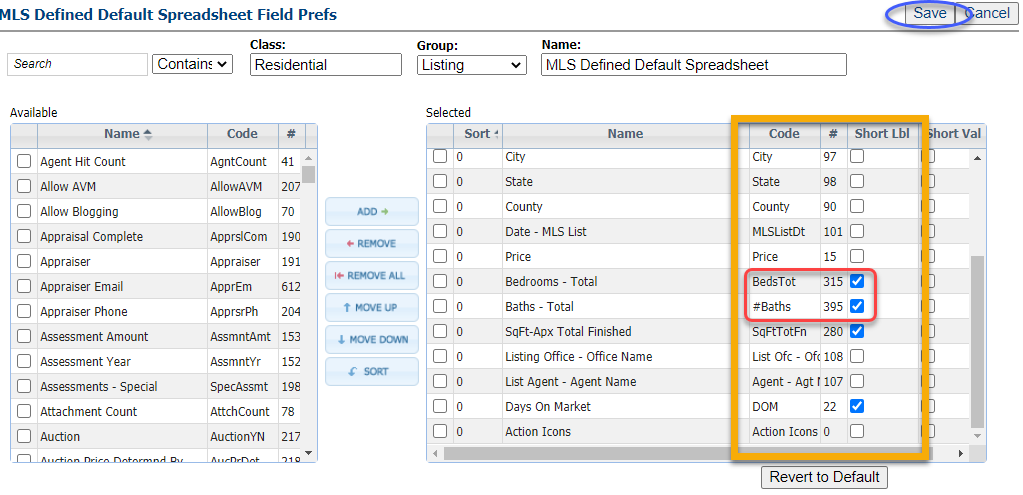
On some columns that you minimize, the header label may get cut off. For example, the "Bedrooms - Total" and "Baths - Total" columns are only so wide because of the length of the header label. When you minimize the column, it cuts off the label.
You can set the header label to its "short label" or abbreviation.
Go to "Customize" in the toolbar and select "Fields."
On the Selected Fields chart, notice the "Short Label" column. Check the box for the columns you want to set to the short label. The "Code" column tells you what the short label will be.
Click "Save."
Rearrange Columns
There's 2 ways to rearrange columns. Begin with choosing the spreadsheet you wish to edit by opening the green "Reports" button from results and open the "Spreadsheets" section. Each spreadsheet report looks the same until you customize. Spreadsheets are customized per class. For example, if you are viewing Residential results, the changes made to this spreadsheet will only be reflected on Residential results.
Option 1: Drag and Drop
For columns already on the spreadsheet, click and hold in the header and drag to the left or right
Wherever you drop the column, notice the green pop-up in the top, right corner confirming your changes have been saved.
Tip: Drag the "plug" icon column from the far right all the way over to the left for easy access to Documents, the Map, Open House & Tour info, and access to third party integrations such as CRS.
Option 2: Rearrange from "Customize"
Go to the toolbar and click "Customize."
Choose "Fields."
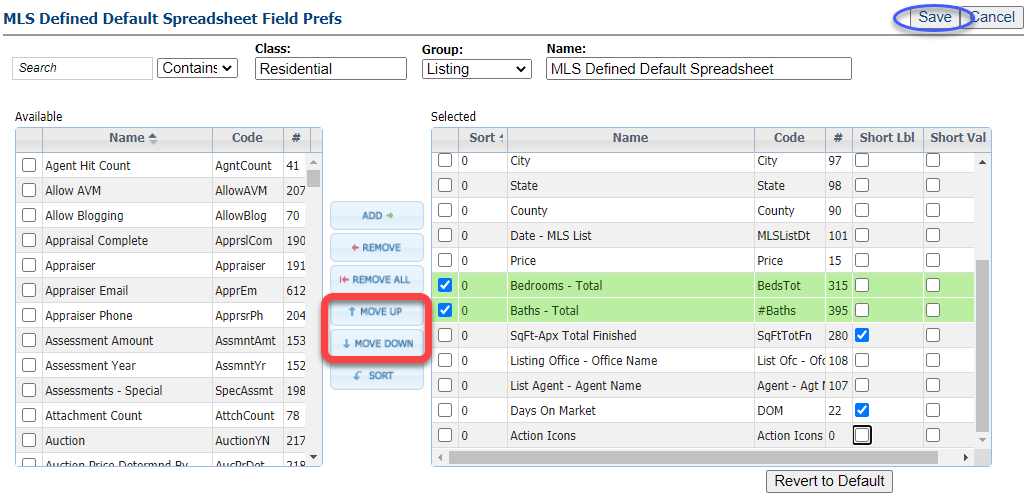
On the Selected side, fields can be rearranged by dragging and dropping individual columns OR check multiple columns and use the "Move Up" and "Move Down" buttons.
Click "Save."
Add & Remove Columns
Is there more information you want to review about listings on the spreadsheet? You can add as many columns as you want and you can remove any information you don't need. Begin by choosing the spreadsheet you wish to edit by opening the green "Reports" button from results and open the "Spreadsheets" section. Each spreadsheet report looks the same until you customize. Spreadsheets are customized per class. For example, if you are viewing Residential results, the changes made to this spreadsheet will only be reflected on Residential results.
Option 1: Add Columns
Go to the toolbar and click "Customize."
Choose "Fields."
From the "Available" box, scroll through the list or use the filter box at the top to add as many fields as you need.
Double-click individual fields or select multiple fields and click "Add." All fields will be added to the Selected Side.
Tip: Once you've added fields, rearrange them to your liking here and set any to their "short label." Refer to the above sections to learn how.
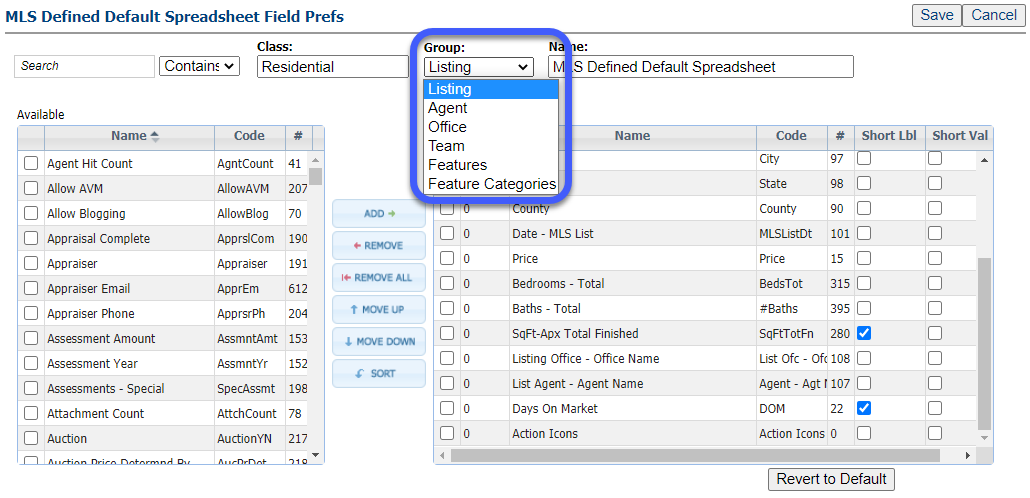
To add Feature fields, update the "Group" from "Listing" to "Features" or "Feature Categories."
Feature Categories will be the entire feature, i.e Style. This will show you every selection each list agent has made on the listing for the Style.
Features will be the individual feature, i.e Central. This will show you only the Central Air selection from the "Cooling" feature category and the field will say "Yes" (meaning the agent selected that the property has central air) or "No" (mean the agent did not select central air on the listing).
Be sure to click "Save."
Option 2: Remove Columns
Go to the toolbar and click "Customize."
Choose "Fields."
From the "Selected" box, scroll through the list to find the fields you wish to remove.
Double-click individual fields or select multiple fields and click "Remove." All fields will be removed from the Selected Side. If you ever need to add them again, they'll be included in the "Available" side.
Click "Save."
Re-Name Spreadsheets
Begin by choosing the spreadsheet you wish to edit by opening the green "Reports" button from results and open the "Spreadsheets" section. Each spreadsheet report looks the same until you customize. Spreadsheets are customized per class; however, in the case of name updates, the name will carry-over to every class. For example, if you name one spreadsheet "My Residential Spreadsheet," you will see that name when you run a search in another class. You will not see the other customizations (like new fields or removed fields), but the name will be seen across all classes.
Step 1: Open Customize
Go to the toolbar and select "Customize"
Choose "Fields."
2. Re-name the Spreadsheet
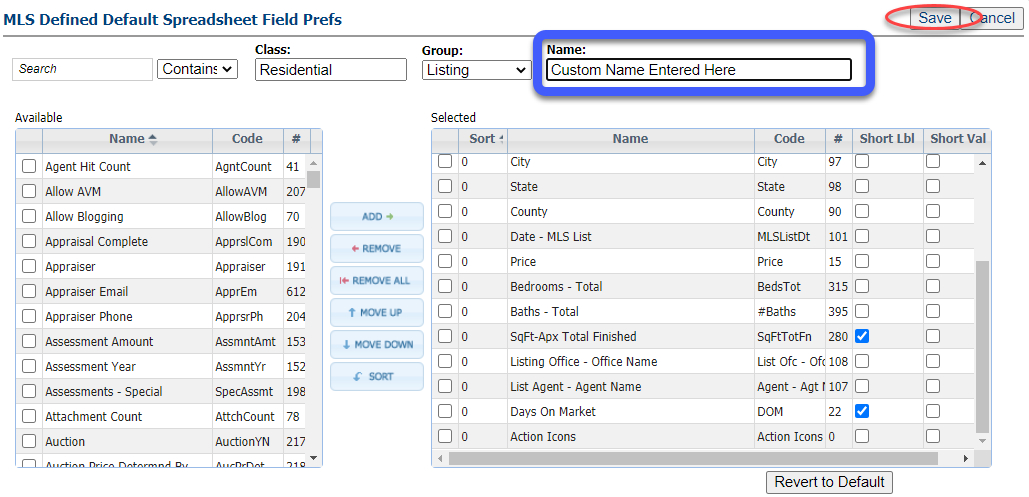
In the pop-up, at the top you can clear out the default name and enter the custom name.
Click "Save."
Sort the Spreadsheet
There are 2 ways to sort the spreadsheet.
Option 1: Sort 1 Column
The default sort for the spreadsheets is by Price, lowest to highest.
To change the sort, click in any header. For example, if you click in the "Date - MLS List" header, it will sort the spreadsheet by list date oldest to newest. Click in the header again and it will sort newest to oldest.
This sort, however, is not saved. The next time you review this spreadsheet, it will revert back to the default of Price, lowest to highest.
Option 2: Sort Multiple Columns and/or Save the Sort
The default sort for the spreadsheet is is by Price, lowest to highest.
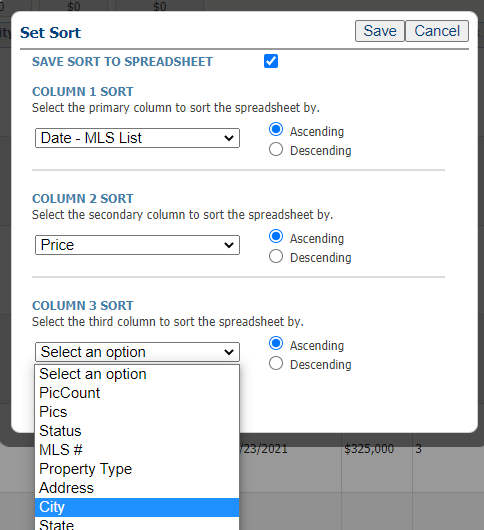
To sort multiple columns and/or save a sort, go to the toolbar and click "Customize."
Choose "Sort."
You can sort up to 3 columns. Choose the columns and the order of "Ascending" or "Descending."
Click "Save."
For the columns you sorted, you'll see numbers in the header letting you know how that spreadsheet is now sorted.
